Fantasy and Fiction


  • Home

  • Archives

A Weird File Rename Issue On Windows7

Posted on 2018-06-01 | Comments: | Views:

Recently, I came upon this issue which bothered me badly as many tools fail to work with that. The symptom is that I can’t rename any file in the file Explorer or command line, both give me an error message saying that access denied or invalid device, I can create a new file though.

To debug what happened under the hood, I wrote a python script to call rename api periodically, and hopes some tool could reveal something.

1
2
3
4
5
6
7
8
9
10
import os
import time

if __name__ == "__main__":
while True:
try:
os.rename('test.txt', 'test1.txt')
except:
pass
time.sleep(1)

First I use Windbg to attach to the python process, run the program and pause it later, it stops at somewhere that there are lot of int 3 instructions that I don’t familiar with so I gave up. I need a breakpoint! So I look up the CPython source code to see what Win API is used for os.rename, here we got it, it’s MoveFileExW.

Type in the breakpoint in the windbg

1
bp MoveFileExW

Then more assembly came out, in fact I’m not sure what they are doing, just following the execution flow to see where it exits, and hope will get some useful information about the early abort error.

...
00000000`770d2dd5 ff158d9e0900    call    qword ptr [kernel32!UnhandledExceptionFilter+0x11a8 (00000000`7716cc68)] ds:00000000`7716cc68={ntdll!ZwSetInformationFile (00000000`77359b10)}
0:000> p
kernel32!MoveFileExW+0x27b:
00000000`770d2ddb 89842480000000  mov     dword ptr [rsp+80h],eax ss:00000000`0026f190=0281af48
0:000> p
kernel32!MoveFileExW+0x282:
00000000`770d2de2 65488b042530000000 mov   rax,qword ptr gs:[30h] gs:00000000`00000030=????????????????
0:000> p
kernel32!MoveFileExW+0x28b:
00000000`770d2deb 488b4860        mov     rcx,qword ptr [rax+60h] ds:000007ff`fffde060=000007fffffd6000
0:000> p
kernel32!MoveFileExW+0x28f:
00000000`770d2def 4c8b8424b8000000 mov     r8,qword ptr [rsp+0B8h] ss:00000000`0026f1c8=00000000004508a0
0:000> p
kernel32!MoveFileExW+0x297:
00000000`770d2df7 33d2            xor     edx,edx
0:000> p
kernel32!MoveFileExW+0x299:
00000000`770d2df9 488b4930        mov     rcx,qword ptr [rcx+30h] ds:000007ff`fffd6030=00000000003f0000
0:000> p
kernel32!MoveFileExW+0x29d:
00000000`770d2dfd ff15c59e0900    call    qword ptr [kernel32!UnhandledExceptionFilter+0x1208 (00000000`7716ccc8)] ds:00000000`7716ccc8={ntdll!RtlFreeHeap (00000000`7731a020)}
0:000> p
kernel32!MoveFileExW+0x2a3:
00000000`770d2e03 8b8c2480000000  mov     ecx,dword ptr [rsp+80h] ss:00000000`0026f190=c00000ba
0:000> p
kernel32!MoveFileExW+0x2aa:
00000000`770d2e0a 85c9            test    ecx,ecx
0:000> p
kernel32!MoveFileExW+0x2ac:
00000000`770d2e0c 0f88a2060200    js      kernel32!GetModuleHandleW+0x13f4 (00000000`770f34b4) [br=1]
0:000> p
kernel32!GetModuleHandleW+0x13f4:
00000000`770f34b4 81f9d40000c0    cmp     ecx,0C00000D4h
0:000> p
kernel32!GetModuleHandleW+0x13fa:
00000000`770f34ba 7408            je      kernel32!GetModuleHandleW+0x1404 (00000000`770f34c4) [br=0]
0:000> p
kernel32!GetModuleHandleW+0x13fc:
00000000`770f34bc 81f9380019c0    cmp     ecx,0C0190038h
0:000> p
kernel32!GetModuleHandleW+0x1402:
00000000`770f34c2 754c            jne     kernel32!GetModuleHandleW+0x1450 (00000000`770f3510) [br=1]
0:000> p
kernel32!GetModuleHandleW+0x1450:
00000000`770f3510 e80be5ffff      call    kernel32!BaseSetLastNTError (00000000`770f1a20)
0:000> p
kernel32!GetModuleHandleW+0x1455:
00000000`770f3515 e9fff8fdff      jmp     kernel32!MoveFileExW+0x2b9 (00000000`770d2e19)
...

Here we got ZwSetInformationFile, I didn’t notice it in the first place since I don’t have any idea about windows driver development.

I went for the Process Monitor (procmon), a tool provided by Microsoft to track all kinds of system events.

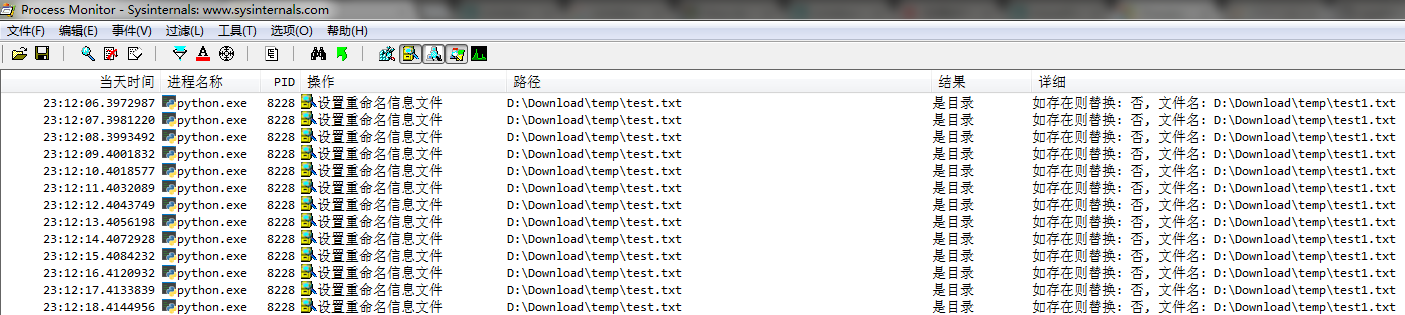
It’s Chinese, the messages say that renaming failed because API thinks the target file name is actually a directory. Well it’s not of course!

After googling a lot, I realized that it’s a minifilter issue that some malfunctioned minifilter dirver intercepts the rename request and drops it accidentally or intentionally. We have fltmc.exe to list them all.

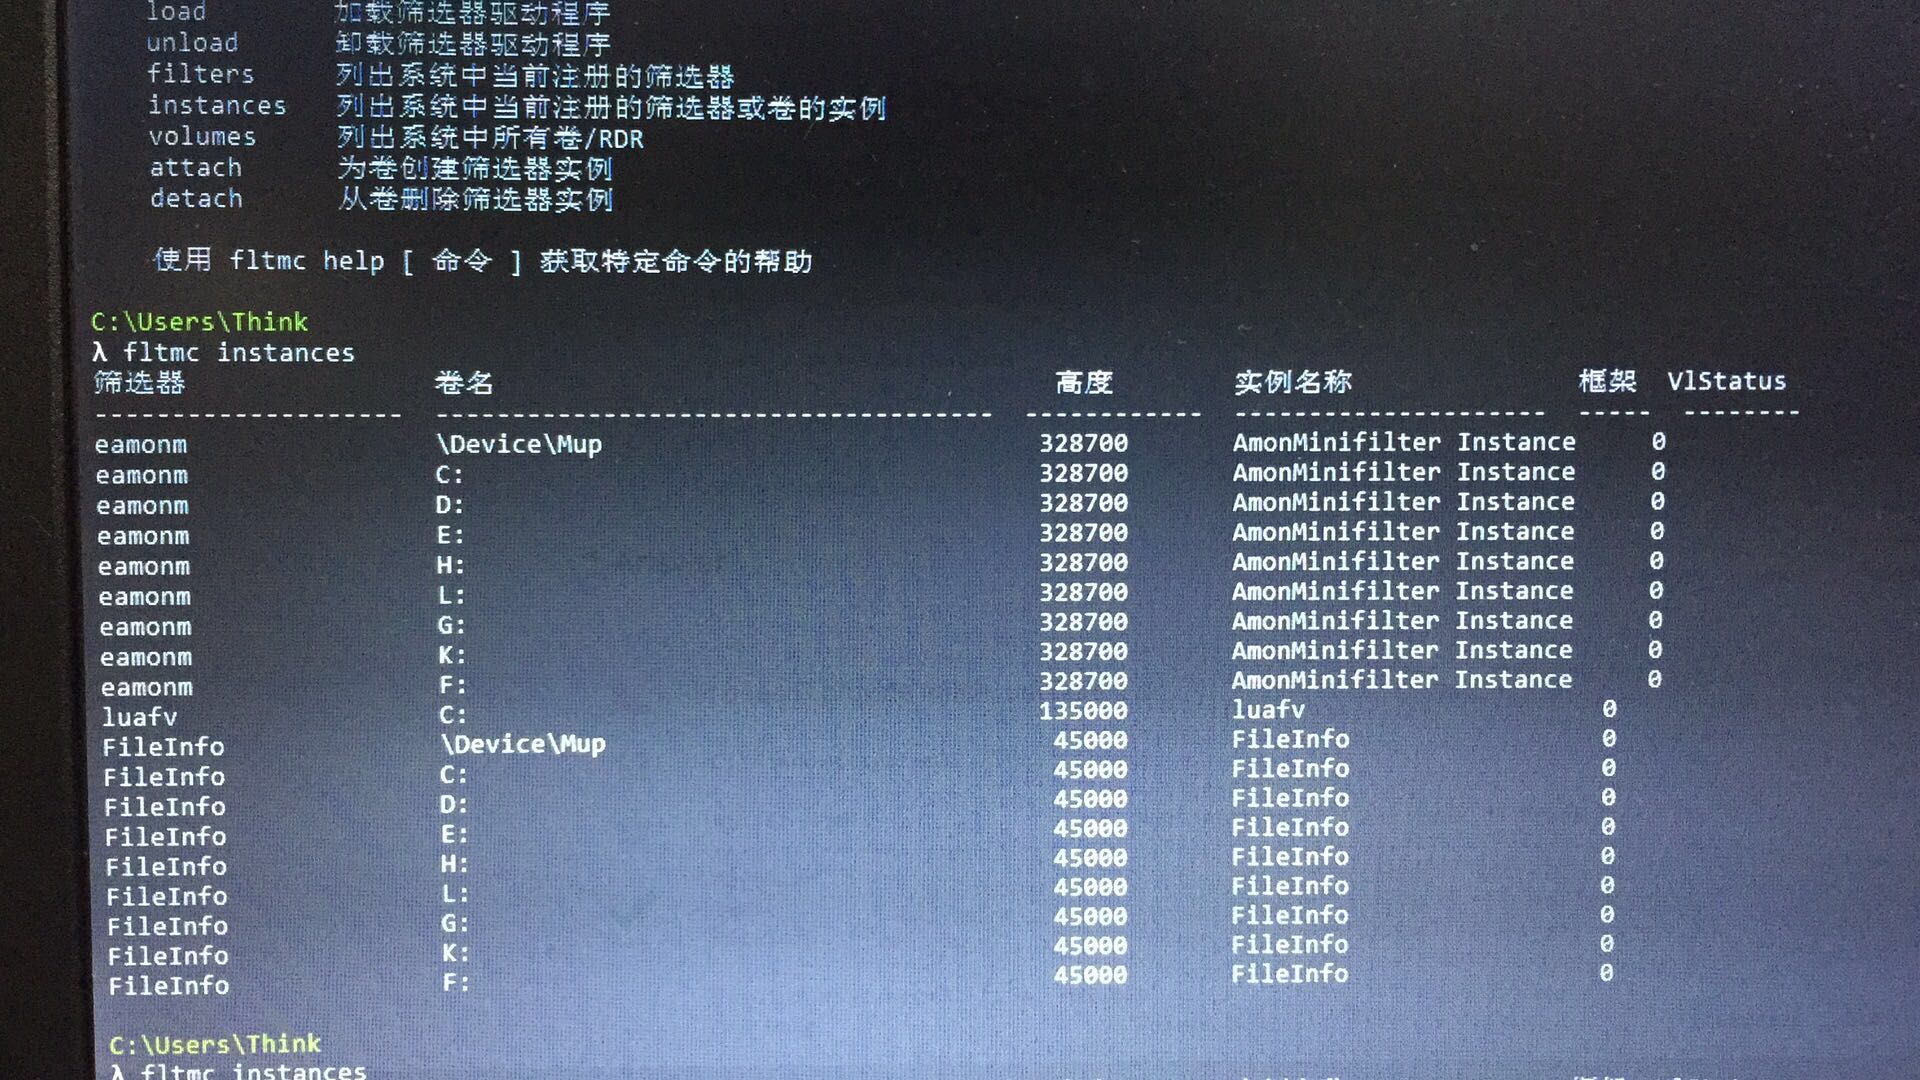
FileInfo and luafv are legal drivers form Microsoft, while eamonm is a driver file form ESET, an anti virus software, you’d think it should be innocent? No, it’s the culprit, after uninstalling it, the issue gone. What the heck! An anti-virus software doing a virus thing!

Compile openocd for ARM platform

Posted on 2018-05-11 | Comments: | Views:

Background

The latest openocd we can get from the apt repository of Raspberry Pi is only up to 0.9.0 as of writing. I’d like to use my Raspberry Pi to download FPGA bit file, but openocd 0.9.0 has some problem to support jlink debugger. See errors below if it’s like your case.

1
2
3
4
5
6
7
8
9
10
11
12
13
14
15
16
17
18
19
20
21
22
23
Pi@Raspberrypi:~/openocd-workdir $ /usr/bin/openocd -f interface/jlink.cfg -f xilinx-xc6v.cfg -f openocd-xc6v.cfg
Open On-Chip Debugger 0.9.0 (2018-01-22-06:14)
Licensed under GNU GPL v2
For bug reports, read
http://openocd.org/doc/doxygen/bugs.html
Info : auto-selecting first available session transport "jtag". To override use 'transport select <transport>'.
xc6v_program_iprog
adapter speed: 5000 kHz
Info : J-Link ARM V8 compiled May 27 2009 17:31:22
Info : J-Link caps 0xb9ff7bbf
Info : J-Link hw version 80000
Info : J-Link hw type J-Link
Info : J-Link max mem block 9752
Info : J-Link configuration
Info : USB-Address: 0x0
Info : Kickstart power on JTAG-pin 19: 0xffffffff
Info : Vref = 2.523 TCK = 1 TDI = 0 TDO = 1 TMS = 0 SRST = 1 TRST = 1
Info : J-Link JTAG Interface ready
Info : clock speed 5000 kHz
Info : JTAG tap: xc6v.tap tap/device found: 0x84250093 (mfg: 0x049, part: 0x4250, ver: 0x8)
Warn : gdb services need one or more targets defined
openocd: jlink.c:1474: jlink_tap_append_step: Assertion `index_var < JLINK_TAP_BUFFER_SIZE' failed.
Aborted

Howerver, it works well on the PC with the openocd 0.10.0 from GNU MCU Eclipse OpenOCD, so I decided to compile it for my Raspberry Pi.

Unfortunately, GNU MCU Eclipse OpenOCD doesn’t support compiling for arm, after some searching on the web, I found an openocd build repository for Arduino which bundled all necessary libraries for building. The openocd included is a bit of old, we can replace it with the latest one.

Cross Compiling

  1. Check out the latest openocd code

    1
    $ git clone git://git.code.sf.net/p/openocd/code openocd
  2. Check out the openocd build script

    1
    $ git clone https://github.com/arduino/OpenOCD-build-script.git openocd-build
  3. Copy it to the build folder, replace the original OpenOCD folder

    1
    2
    $ mv openocd-build/OpenOCD{,-old}
    $ cp openocd openocd-build/OpenOCD -r
  4. Add the cross compile arguments in the compile_unix_openocd.sh

    1
    2
    3
    4
    5
    6
    # Foundation, Inc., 51 Franklin Street, Fifth Floor, Boston, MA  02110-1301, USA.
    ARCH=`gcc -v 2>&1 | awk '/Target/ { print $2 }'`

    # Add two new arguments, check uname -m for your build PC's architecture
    BUILD="x86_64-pc-linux-gnu"
    HOST="arm-linux-gnueabihf"
  5. Append the cross compile flags to all configuration steps, like this

    1
    2
    3
    ...
    ./configure --enable-static --disable-shared --disable-blkid --disable-kmod --disable-manpages --host=$HOST --build=$BUILD
    ...
  6. Build it, install any missed packages if the build process reports, like gperf

    1
    $ ./compile_unix_openocd.sh

However the binary generated this way is failed to run on the raspberry pi with a segment fault, not sure why. Instead, I went for a native building.

Native Compiling On Raspberry Pi

Nothing need to change except updating the OpenOCD code. The new generated openocd solved the problem in the first place.

Use OpenOCD to program FPGA for Xilinx Virtex-6 XC6 Series

Posted on 2018-05-04 | Comments: | Views:

Note: Currently it’s only tested for Virtex-6 XC6VLX240T, suppose to be able to extend for more virtext-6 FPGAs

Work Environment

  1. Windows 7 64bit
  2. Xilinx Virtex-6 FPGA ML605 Evaluation Kit

Installation Guide

  1. Unzip the OpenOCD binary zip file to anywhere you’re used to put a tool, like d:\tools\
  2. Add the OpenOCD executable path to the PATH environment, reboot or logout to put it into effect

    Note: if you’re using cmder, we can make it without a rebooting

    • Go to Setting->Startup->Environment
    • Set the PATH environment: set PATH=D:\tools\openocd\bin;%PATH%
    • Open a new console to load the new environments
  3. Install USB JTAG cable driver
    The adapter DLC9G that comes with Xilinx Virtex-6 Evaluation Kit is not supported by OpenOCD due to its proprietary protocol, here we’ll use jlink instead.

    • Download zadig
    • Go to Options->List All devices
    • Select the jlink device, vid: 1366, pid: 0101
    • Click “Replace Driver”.

    • Jumper wiring jlink pins to jtags pins on board


Programming

  1. Put the OpenOCD configuration file in the work dir together with the bit file (file content attached at the end).

    1
    2
    3
    4
    5
    $ cd d:\workdir
    $ dir
    openocd-xc6v.cfg
    xilinx-xc6v.cfg
    bitstream.bit
  2. Modify the path to the bit file in the configuration

    1
    2
    3
    4
    5
    6
    ...
    init
    xc6v_program xc6v.tap
    pld load 0 bitstream.bit #### this one ####
    exit
    ...
  3. Run openocd in the cmd.exe or a cmder console

    1
    $ openocd -f interface/jlink.cfg -f xilinx-xc6v.cfg -f openocd-xc6v.cfg
  4. Waiting for the programming done if no error raised

    1
    2
    3
    4
    5
    6
    7
    8
    9
    10
    11
    12
    13
    14
    15
    $ openocd -f interface/jlink.cfg -f xilinx-xc6v.cfg -f openocd-xc6v.cfg
    GNU MCU Eclipse 64-bits Open On-Chip Debugger 0.10.0+dev-00404-g20463c28 (2018-01-23-12:30)
    Licensed under GNU GPL v2
    For bug reports, read
    http://openocd.org/doc/doxygen/bugs.html
    Info : auto-selecting first available session transport "jtag". To override use 'transport select <transport>'.
    xc6_program_iprog
    adapter speed: 5000 kHz
    Info : J-Link ARM V8 compiled May 27 2009 17:31:22
    Info : Hardware version: 8.00
    Info : VTarget = 2.478 V
    Info : clock speed 5000 kHz
    Info : JTAG tap: xc6.tap tap/device found: 0x84250093 (mfg: 0x049 (Xilinx), part: 0x4250, ver: 0x8)
    Warn : gdb services need one or more targets defined
    loaded file bitstream.bit to pld device 0 in 46s 322000us

OpenOCD Configuration (openocd-xc6v.cfg)

1
2
3
4
5
6
adapter_khz 5000

init
xc6v_program xc6v.tap
pld load 0 bitstream.bit
exit

OpenOCD Target Configuration (xilinx-xc6v.cfg)

1
2
3
4
5
6
7
8
9
10
11
12
13
14
15
16
17
18
19
20
21
22
23
24
25
26
27
28
29
if { [info exists CHIPNAME] } {
set _CHIPNAME $CHIPNAME
} else {
set _CHIPNAME xc6v
}

set XC6V_CFG_IN 0x05
set XC6V_JSHUTDOWN 0x0d
set XC6V_JPROGRAM 0x0b
set XC6V_JSTART 0x0c
set XC6V_BYPASS 0x3f

# Device ID Code IR Length Part Name
# 84250093 10 XC6VLX240T
# 44244093 10 XC6VLX75T
# c2a96093 10 XC6VLX50T
# 442a8093 10 XC6VHX380T

jtag newtap $_CHIPNAME tap -irlen 10 -ignore-version \
-expected-id 0x84250093
pld device virtex2 $_CHIPNAME.tap

proc xc6v_program {tap} {
global XC6V_JSHUTDOWN XC6V_JPROGRAM XC6V_JSTART XC6V_BYPASS
irscan $tap $XC6V_JSHUTDOWN
irscan $tap $XC6V_JPROGRAM
irscan $tap $XC6V_JSTART
irscan $tap $XC6V_BYPASS
}

Use OpenOCD to program FPGA for Xilinx Virtex XC7 Series

Posted on 2018-04-02 | Comments: | Views:

Work Environment

  1. Windows 7 64bit
  2. Xilinx Virtex-7 FPGA VC709 Connectivity Kit

Installation Guide

  1. Unzip the OpenOCD binary zip file to anywhere you’re used to put a tool, like d:\tools\
  2. Add the OpenOCD executable path to the PATH environment, reboot or logout to put it into effect

    Note: if you’re using cmder, we can make it without a rebooting

    • Go to Setting->Startup->Environment
    • Set the PATH environment: set PATH=D:\tools\openocd\bin;%PATH%
    • Open a new console to load the new environments
  3. Install USB JTAG cable driver

    • Download zadig
    • Go to Options->List All devices
    • Select the first cable port (interface 0 or Port A), vid: 0403, pid: 6010
    • Click “Replace Driver”.

Programming

Target Xilinx Virtex XC7 series as of now

  1. Put the OpenOCD configuration file in the work dir together with the bit file (file content attached at the end).

    1
    2
    3
    4
    $ cd d:\workdir
    $ dir
    openocd.cfg
    a-bit-file.bit
  2. Modify the path to the bit file in the configuration

    1
    2
    3
    4
    5
    6
    ...
    init
    xc7_program xc7.tap
    pld load 0 a-bit-file.bit #### this one ####
    exit
    ...
  3. Run openocd in the cmd.exe or a cmder console

    1
    $ openocd --command "tcl_port disabled" --command "telnet_port disabled"

    If the configuration file is not in the current work directory, we can specifiy it in the command line

    1
    $ openocd -f <path_to_config> --command "tcl_port disabled" --command "telnet_port disabled"
  4. Waiting for the programming done if no error raised

    1
    2
    3
    4
    5
    6
    7
    8
    9
    10
    11
    12
    13
    $ openocd
    GNU MCU Eclipse 64-bits Open On-Chip Debugger 0.10.0+dev-00404-g20463c28 (2018-01-23-12:30)
    Licensed under GNU GPL v2
    For bug reports, read
    http://openocd.org/doc/doxygen/bugs.html
    none separate
    Info : auto-selecting first available session transport "jtag". To override use 'transport select <transport>'.
    adapter speed: 25000 kHz
    Info : ftdi: if you experience problems at higher adapter clocks, try the command "ftdi_tdo_sample_edge falling"
    Info : clock speed 25000 kHz
    Info : JTAG tap: xc7.tap tap/device found: 0x33691093 (mfg: 0x049 (Xilinx), part: 0x3691, ver: 0x3)
    Warn : gdb services need one or more targets defined
    loaded file a-bit-file.bit to pld device 0 in 16s 603000us

OpenOCD Configuration

1
2
3
4
5
6
7
8
9
10
11
12
13
14
15
16
17
source [find interface/ftdi/digilent-hs1.cfg]
source [find cpld/xilinx-xc7.cfg]
#source [find cpld/jtagspi.cfg]
adapter_khz 25000

init
xc7_program xc7.tap
pld load 0 a-bit-file.bit
exit

## programming SPI Flash
# init
# jtagspi_init 0 xc7_bscan_spi.bit
# jtagspi_program a-bit-file.bit 0
# xc7_program xc7.tap
# pld load 0 a-bit-file.bit
# exit

Cross compile mongodb for 32 bit arm

Posted on 2018-03-23 | Comments: | Views:

I’d like to run a relatively modern mongodb server on my cubieboard which is powered by an ARMv7l chip. There was a good work but it was built against 2.6.3 thus a bit out-dated. The latest version of mongodb that supports 32 bit platform is 3.3.15. That’s what I’d like to try here.

  1. Prepare the build environment

    1
    2
    3
    $ sudo apt-get install build-essential wget scons
    $ sudo apt-get install libboost-filesystem-dev libboost-program-options-dev libboost-system-dev libboost-thread-dev
    $ sudo apt-get install g++-5-arm-linux-gnueabihf g++-5-arm-linux-gnueabihf
  2. You might need to update the cross-compile toolchain accordingly to make arm-linux-gnueabihf-gcc point to the correct version, details see this post.

    1
    $ sudo update-alternatives --install /usr/bin/arm-linux-gnueabihf-gcc arm-linux-gnueabihf-gcc /usr/bin/arm-linux-gnueabihf-gcc-5 100 --slave /usr/bin/arm-linux-gnueabihf-g++ arm-linux-gnueabihf-g++ /usr/bin/arm-linux-gnueabihf-g++-5
  3. Download and unpack mongodb source code

    1
    2
    3
    4
    5
    $ mkdir install
    $ cd install
    $ wget https://fastdl.mongodb.org/src/mongodb-src-r3.3.15.tar.gz
    $ tar xvf mongodb-src-r3.3.15.tar.gz
    $ cd mongodb-src-r3.3.15
  4. Generate additional sources. It’s suggested by this post.

    1
    2
    3
    4
    $ cd src/third_party/mozjs-45/
    $ ./get_sources.sh
    $ ./gen-config.sh arm linux
    $ cd -

    As I was doing it, an error raised saying a file missed.

    1
    fatal error: js-config.h: No such file or directory

    Therefore some extra parameters were added in the file gen-config.sh to fix it.

    1
    PYTHON=python ./configure --without-intl-api --enable-posix-nspr-emulation --disable-trace-logging --host=arm-linux --target=arm-linux-gnueabihf --build=x86_64-linux
  5. More modifications to move on.

    • No pause implementation.

      Error message:

      1
      2
      3
      4
      5
      6
      In file included from src/mongo/util/concurrency/spin_lock.cpp:34:0:
      src/mongo/platform/pause.h:71:2: error: #error "No processor pause implementation for this architecture."
      #error "No processor pause implementation for this architecture."
      src/mongo/util/concurrency/spin_lock.cpp: In member function 'void mongo::SpinLock::_lockSlowPath()':
      src/mongo/util/concurrency/spin_lock.cpp:57:34: error: 'MONGO_YIELD_CORE_FOR_SMT' was not declared in this scope
      MONGO_YIELD_CORE_FOR_SMT();

      Modification:

      mongo uses some processor pause signal to make CPU work more effectively, arm (armv7l) is out of support in this case, add it along with aarch64 in the file src/mongo/platform/pause.h.

      1
      2
      3
      #elif defined(__aarch64) || defined(__arm__)

      #define MONGO_YIELD_CORE_FOR_SMT() __asm__ volatile("yield" ::: "memory")
    • config.h missing for gperftools 2.5

      Error message:

      1
      src/third_party/gperftools-2.5/src/base/dynamic_annotations.c:38:20: fatal error: config.h: No such file or directory

      Modification:

      The missed file is generated by ./configure, download a gperftools source code.

      1
      2
      3
      4
      $ wget https://github.com/gperftools/gperftools/releases/download/gperftools-2.5/gperftools-2.5.tar.gz
      $ tar xf gperftools-2.5.tar.gz
      $ cd gperftools-2.5
      $ ./configure --target=arm-linux-gnueabihf --host=arm-linux --build=x86_64-linux

      Find the file in the path src/config.h, copy it to the mongo third party directory src/third_party/gperftools-2.5/build_linux_arm.

    • --std=c++11 issue when compiling gperftools 2.5

      Error message:

      1
      2
      3
      src/base/linux_syscall_support.h: In function ‘pid_t sys_getpid()’:
      src/base/linux_syscall_support.h:1304:33: error: expected string-literal before ‘:’ token
      : "lr", "memory");

      Modification:

      It’s a problem reported here and fixed here. Use gnu++11 instead of c++11 in the top level SConstruct of mongodb.

      1
      2
      if not AddToCXXFLAGSIfSupported(myenv, '-std=gnu++11'):
      myenv.ConfError('Compiler does not honor -std=gnu++11')
    • call of overloaded appendNumber is ambitious

      Error message:

      1
      2
      3
      4
      5
      src/mongo/util/procparser.cpp: In function 'mongo::Status mongo::procparser::parseProcStat(const std::vector<mongo::StringData>&, mongo::StringData, int64_t, mongo::BSONObjBuilder*)':
      src/mongo/util/procparser.cpp:281:49: error: call of overloaded 'appendNumber(mongo::StringData&, uint64_t&)' is ambiguous
      builder->appendNumber(key, value);
      ^
      In file included from src/mongo/util/procparser.cpp:51:0:

      Modification:

      Change the argument type from uint64_t to long long for all calls of appendNumber, details see here.

  6. Compile and build.

    WiredTiger will not work on a 32 bit architecture so you will encounter some compilation challenges with it. It is recommended to simply exclude the WiredTiger storage engine altogether. That means you will run MongoDB with the MMAPv1 storage engine only.

    1
    $ scons mongo mongod --wiredtiger=off --mmapv1=on CC=arm-linux-gnueabihf-gcc CXX=arm-linux-gnueabihf-g++
  7. Reduce binaries file size.

    1
    2
    $ arm-linux-gnueabihf-strip -s mongo
    $ arm-linux-gnueabihf-strip -s mongod
  8. Install binaries

    Copy all the binaries to the cubieboard.

    1
    $ sudo cp mongo mongod /usr/local/bin/

Binary Provided

I have compiled MongoDB 3.3.15 for ARM. You can DOWNLOAD it.


Credits:

  • Compile and install MongoDB on Raspberry PI
  • Cross Compile MongoDB for ARM

Install multi-version cross-compile toolchain on ubuntu

Posted on 2018-03-22 | Comments: | Views:

As of ubuntu 17.10, apt source has provided us several cross-compile toolchains for the ARM platform:

  • gcc-5-arm-linux-gnueabihf
  • gcc-6-arm-linux-gnueabihf
  • gcc-7-arm-linux-gnueabihf
  • …

After getting them installed, these tools got a suffix number to indicate the version, like /usr/bin/arm-linux-gnueabihf-gcc-5.

We’d like to specify which one to use as per the project requirement.

Fortunately we can make it easily by using the tool update-alternatives which comes with the ubuntu distribution.

1
$ sudo update-alternatives --install /usr/bin/arm-linux-gnueabihf-gcc arm-linux-gnueabihf-gcc /usr/bin/arm-linux-gnueabihf-gcc-5 100 --slave /usr/bin/arm-linux-gnueabihf-g++ arm-linux-gnueabihf-g++ /usr/bin/arm-linux-gnueabihf-g++-5

Here, we have provided the arm-linux-gnueabihf-gcc as the master and arm-linux-gnueabihf-g++ as slave. Multiple slaves can be appended along with master. When master symbolic link is changed, the slaves will be changed too.

Pass the second version of these tools to be recorded:

1
$ sudo update-alternatives --install /usr/bin/arm-linux-gnueabihf-gcc arm-linux-gnueabihf-gcc /usr/bin/arm-linux-gnueabihf-gcc-6 50 --slave /usr/bin/arm-linux-gnueabihf-g++ arm-linux-gnueabihf-g++ /usr/bin/arm-linux-gnueabihf-g++-6

Now you can switch between these versions by using:

1
$ sudo update-alternatives --config arm-linux-gnueabihf-gcc

一个flv.js简单demo

Posted on 2018-02-02 | Comments: | Views:

参考demo

  1. 启动web server

    通常我们需要安装apache或者nginx,这里只需要一个简单的静态server就够了,因为flv的解析都在浏览器前端。

    • python 2
    1
    python -m SimpleHTTPServer
    • python 3
    1
    py -m http.server
  2. 把文后的js源文件放到web server根目录

  3. 浏览器打开默认的server地址,localhost:8000

    这个时候还看不到视频内容,因为媒体文件还没有

  4. 用ffmpeg制作一个flv文件

    1
    ffmpeg -f gdigrab -framerate 10 -i desktop -vcodec h264 -acodec aac -f flv movie.flv

    这里是在录制屏幕并输出到movie.flv,注意要选择编码器,默认的编码flv.js并不支持,然后也放到根目录

    默认编码器

    1
    encoder         : Lavc57.107.100 flv

    指定后

    1
    encoder         : Lavc57.107.100 libx264
  5. 最后再刷新主页,可以播放视频了


js源文件

点击显/隐内容
1
2
3
4
5
6
7
8
9
10
11
12
13
14
15
16
17
18
19
20
21
22
23
24
25
26
27
28
29
30
31
32
33
34
35
36
37
38
39
40
41
42
43
44
45
46
47
48
49
50
51
52
53
54
55
56
57
58
59
60
61
62
63
64
65
66
67
68
69
70
71
72
73
74
75
76
77
78
79
80
81
82
83
84
85
86
87
88
89
90
91
92
<!DOCTYPE html>
<html>

<head>
<meta content="text/html; charset=utf-8" http-equiv="Content-Type">
<title>flv.js demo</title>
<style>
.mainContainer {
display: block;
width: 1024px;
margin-left: auto;
margin-right: auto;
}

.urlInput {
display: block;
width: 100%;
margin-left: auto;
margin-right: auto;
margin-top: 8px;
margin-bottom: 8px;
}

.centeredVideo {
display: block;
width: 100%;
height: 576px;
margin-left: auto;
margin-right: auto;
margin-bottom: auto;
}

.controls {
display: block;
width: 100%;
text-align: left;
margin-left: auto;
margin-right: auto;
}
</style>
</head>
<body>
<div class="mainContainer">
<video id="videoElement" class="centeredVideo" controls autoplay width="1024" height="576">Your browser is too old which doesn't support HTML5 video.</video>
</div>
<br>
<div class="controls">
<!--<button onclick="flv_load()">加载</button>-->
<button onclick="flv_start()">开始</button>
<button onclick="flv_pause()">暂停</button>
<button onclick="flv_destroy()">停止</button>
<input style="width:100px" type="text" name="seekpoint" />
<button onclick="flv_seekto()">跳转</button>
</div>
<script src="https://cdn.bootcss.com/flv.js/1.4.0/flv.min.js"></script>
<script>
var player = document.getElementById('videoElement');
if (flvjs.isSupported()) {
var flvPlayer = flvjs.createPlayer({
type: 'flv',
"isLive": true,//<====加个这个
url: 'movie.flv',//<==自行修改

});
flvPlayer.attachMediaElement(videoElement);
flvPlayer.load(); //加载
flv_start();
}

function flv_start() {
player.play();
}

function flv_pause() {
player.pause();
}

function flv_destroy() {
player.pause();
player.unload();
player.detachMediaElement();
player.destroy();
player = null;
}

function flv_seekto() {
player.currentTime = parseFloat(document.getElementsByName('seekpoint')[0].value);
}
</script>
</body>

</html>

一个诡异的232串口故障

Posted on 2017-07-29 | Comments: | Views:

前段时间收到一块LED显示屏的通讯电路板,有很明显的串口通讯问题,表现就是无收发数据,显示屏无显示,量测TX和RX上也的确没有电平变化。
MAX3232电路图
尝试替换MAX3232芯片后,问题依旧,因为以前吃过亏,怀疑买到假货,又替换SP3232,还是趴窝,苦思不得其解,买假货买到怀疑人生。。。
过了几天重新制作一批板子,同样的232芯片居然是正常工作的,才反应过来可能是配套电容有问题。回过头又重新观察232串口电路,拿示波器依次量测几颗电容两端的电压,对比正常板子,发现问题板子这几个点位信号幅度大约只有正常板子的一半,但电容两端的信号仍然保持反向对称,只有pin 1和pin 3之间的这颗电容两端,不仅幅度减半,pin 3的信号异常低,只有大约300mV的幅度,遂替换之,问题立马消失。
那么这颗电容到底有什么问题呢,上图
罪魁祸首
大概是某小作坊良心之作,一端的焊盘直接脱落了。。。WTF

ETL利器Kettle数据库同步实战

Posted on 2016-12-25 | Comments: | Views:

最近有需求在SQL server和MySQL之间数据库同步,在比较多种方案后选择了Kettle,因其开源免费,用户多文档完善,图形化编辑上手容易。这里使用了其最新版本,Pentaho Data Integration 7.0。

具体需求不复杂,要从MySQL数据库一张表定期更新到SQL server数据库。这里面数据库之间的差异,Kettle已经通过SQL语言抽象,所以只要处理表结构的差异和转换,主要是数据类型的转换和值映射。这些转换都使用了Script Values / Mod模块处理。而类型和值都匹配仅字段名不同的转换,可以直接在Insert / Update模块里面映射。

为了便于后续调试,为远程MySQL数据库做了一个本地映射,这里用到了合并模块Merge Rows (diff)和同步模块Synchronize after merge。

首先为这三个数据分别建立连接。从左边设计面板拖出一个表输入模块Table input。
Table input

点击New按钮,为数据库连接配置参数。配置好后可以点下面的Test按钮,测试配置是否正确。为本地备份数据库也如此建立连接。
Edit connection for MySQL
这是SQL Server数据库的连接配置。
Edit connection for SQL server
注意从官网下载的Kettle缺少这两个数据库的驱动文件。分别是jtds-1.3.1.jar和mysql-connector-java-5.1.40-bin.jar。放到kettle的lib目录下即可。

然后建立远端数据库到本地数据库的映射,同样从左边面板拖出来Merge Rows (diff),这个模块根据若干Key来检索两边数据,然后根据选定的若干Value来检查数据是否一致,哪边的数据较新,哪边的过时。
Merge Rows (diff)
注意这里的Flag fieldname字段,它会作为输出之一送到后续模块,后面会看到它的作用。

接着放上同步模块Synchronize after merge,这里有个坑,可以看到General页旁边还有个Advanced页面,一般这种并排折叠的tab页都是些高级配置,不配置默认就不起作用。然而这里不是,它不配置就无法正常工作。
Synchronize after merge
Synchronize after merge Advanced
这是配置后的样子,可以看到前面的flagfield字段的作用,它会保存前面Merge模块的比较结果,有三个值new,changed和deleted,意思是对照远程参考数据库,正在检索的数据是否是新添加的,是否是已经有的数据但是需要更新的,是否是过时的数据需要删除的。

接着来到Script Values / Mod模块,这是整个任务的重点,

1
2
3
4
5
6
7
8
9
10
11
12
13
14
15
16
17
18
19
20
21
22
23
24
25
26
27
28
29
//类型映射,datetime to string可以方便地用内置的JS函数库date2str来完成
i_FStartDate = date2str(WRITE_DATE, "yyyy-mm-dd hh:mm:ss");
i_FCreateDate = i_FStartDate;
var d1 = str2date(i_FStartDate, "yyyy-mm-dd hh:mm:ss");

// 值映射
switch (true) {
case (PASS_TYPE.equals("员工车辆")):
// 还可以对数据做一些计算后转换
i_FEndDate = dateAdd(d1, "y", year(VALID_DATE));
i_FEndDate = date2str(i_FEndDate, "yyyy-mm-dd hh:mm:ss");
i_FCardTypeID = 1010;
break;
case (PASS_TYPE.equals("客户车辆")):
i_FEndDate = dateAdd(d1, "y", year(VALID_DATE));
i_FEndDate = date2str(i_FEndDate, "yyyy-mm-dd hh:mm:ss");
i_FCardTypeID = 1020;
break;
case (PASS_TYPE.equals("作业车辆")):
i_FEndDate = dateAdd(d1, "y", year(VALID_DATE));
i_FEndDate = date2str(i_FEndDate, "yyyy-mm-dd hh:mm:ss");
i_FCardTypeID = 1030;
break;
default:
i_FEndDate = dateAdd(d1, "y", year(VALID_DATE));
i_FEndDate = date2str(i_FEndDate, "yyyy-mm-dd hh:mm:ss");
i_FCardTypeID = 1020;
break;
}

datetime to string可以方便地用内置的JS函数库date2str来完成,甚至进而可以对数据做一些计算,这里体现了用javascript转换的灵活性,这在Insert / Update是不可能的。 注意转换后的字段,在javascript可以当成普通变量赋值,只要在下面的Fields里面声明过。
Script Values / Mod

最后将处理好的字段和可以直接映射的字段,在Insert /Update里面做好一一映射。这里也有个新手坑,根据look up keys检索不到的数据会被insert到目标数据库,检索到的数据会接着去比较下面的Update fields映射表,值不同的字段会接着去Update,除非后面Update字段指定了N。然而对于没有在Update fields表里出现的字段,该模块即不会去insert也不会去update。这点区别很重要,因为一般数据表都会有一个主键,这个键是不能重复的,如果insert或update时包含了这个字段,会报错该字段无法更新。所以不要把主键或者Identity属性字段放到Update fields里面,让数据库内部自动分配主键,这也适用于其它自动过程控制的字段。
Insert / Update

这样就得到了最终的转换方案。
Final solution

为了定期运行这个转换任务(Transformation),还要建立Kettle里面的Job任务,也很简单,新建一个job,拖出start模块。设置运行间隔。
Job Scheduling
然后拖出Transformation模块,指定之前配置的转换任务文件路径。
Transformation
连接两个模块,搞定。
Job

不重装迁移系统到新磁盘

Posted on 2016-12-24 | Comments: | Views:

几年前700多大洋入的浦科特128G SSD 近来愈发觉得不够用,趁着今年双十一终于决定再入一块三星256G SSD,仍然是700多大洋。虽然并不喜欢三星MLC工艺,无奈这么多年过去接口升级换代,当年的mSATA也只有三星还在稳定出货价钱合适。这应该是小黑T420最后一次磁盘升级了。

用了这么多年的系统,装了无数大小软件,实在不想再重装系统,之前从HDD到SSD,使用分区助手的迁移系统功能,轻松完成转换。这次因为系统盘上有双系统,所以并不能直接用”系统迁移到SSD/HDD”,而是选了”扇区到扇区复制”,希望保留双系统配置。当然小黑只有一个mSATA接口,为了完成这次任务,又入了佳翼的mSATA移动硬盘盒。然后选择正确的磁盘,根据提示重启后开始复制,这个过程大概进行了1小时40分钟,因为小黑那个时代还只有USB2.0,接口速度比较慢只有150Mbps,所以可以算出120G*8/150Mbps = 1.8小时。
JEYI
分区助手复制磁盘

复制完成后,满怀希望地换上新的SSD,以为开机重启就焕发新生了,前面Clover引导都很正常,然后就碰到下面这个鬼画面。
0xc000000e

网上搜索都指向修复\boot\BCD文件,但是首先需要一张系统恢复DVD,而且更关键的是貌似需要重置MBR,而我的MBR已经配置了Clover,当初好不容易搞定三系统,轻易不想再动它。于是继续搜索,意识到系统认为硬件变动了,那体现在BCD里面,就只有分区GUID不同,为新分区重建一个entry应该就可以了。换回旧SSD启动电脑,这里用了EasyBCD来操作,其背后会调用bcdedit.exe来操作BCD文件。首先配置下EasyBCD编辑的BCD文件,然后重启程序让设置生效。这里直接指向了新SSD系统使用的BCD,但是安全起见,最好复制一份出来然后在上面编辑,最后再复制回去。
设定BCD文件位置
然后新建启动入口。
新建启动项
这里选择了新分区所在的盘符K。

然后用bcdedit.exe(可以在EasyBCD安装目录下找到)找到新建项目的GUID

1
2
bcdedit /store <path_to_bcd> /enum all
bcdedit /store <path_to_bcd> /enum all /v

将盘符改回c盘,设置新建条目为默认启动项。

1
2
3
bcdedit /store <path_to_bcd> /set {bootmgr} default <new guid>
bcdedit /store <path_to_bcd> /set {default} osdevice c:
bcdedit /store <path_to_bcd> /set {default} device c:

因为换到新磁盘启动时,系统分区一般就是c盘。可能有人会疑问为什么新建条目时,不直接选c盘,我的理解是GUID是从分区算出来的,选c盘可能会算出旧分区的GUID,这与我们的要求不符。改完之后重启,还是失败,但是错误原因已经变了,是找不到启动程序winload,而不再是压根都找不到设备,看来猜测靠谱。
0xc000000e again

但是明明winload是不会丢的,系统找不到,可能跟多系统有关,引导程序错误地在一个分区搜索winload。继续搜索找到了解决之道,将启动分区从c:改成boot,意思是让引导程序在当前分区寻找winload。重启搞定。

1
2
bcdedit /store <path_to_bcd> /set {default} osdevice boot
bcdedit /store <path_to_bcd> /set {default} device boot

123

Pansila

22 posts
© 2018 Pansila
Powered by Hexo
|
Theme — NexT.Gemini v6.0.6